The Raspberry Pi 5 has emerged as a powerful tool for integration into amateur astronomy setups. With its compact size, low power consumption, and versatility, the Raspberry Pi can serve as the brain of an astronomical imaging system, controlling devices such as telescopes, cameras, and mounts. One limiting factor though is the size and speed of the microsSD card when used as the primary boot and storage device, which for tasks demanding high-speed data transfer and storage can sometimes fall short. Fear not, as there’s a solution: installing NVMe SSD via PCIe on a Raspberry Pi 5. In this guide, we’ll walk you through the process of harnessing the power of NVMe SSDs with your Raspberry Pi 5 using the PCIe interface, unlocking blazing-fast storage speeds and expanding the capabilities for your astronomy imaging storage.
Prerequisites
Before diving into the installation process, ensure you have the following:
- Raspberry Pi 5 board.
- NVMe SSD with M.2 interface.
- PCIe adapter card compatible with Raspberry Pi 5 (e.g., PCIe 2.0 x1).
- Adequate power supply for both the Raspberry Pi and the NVMe SSD.
- Basic familiarity with Raspberry Pi setup and configuration.
Step 1: Prepare the Raspberry Pi 5
Ensure your Raspberry Pi 5 is powered off and disconnected from any power source. If you haven’t already done so, insert the microSD card with your preferred operating system installed.
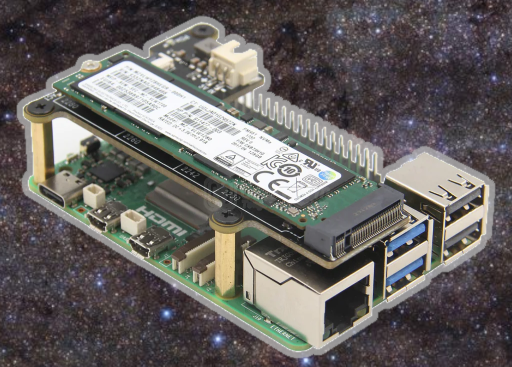
Step 2: Install the NVMe SSD onto the PCIe Adapter
If your NVMe SSD requires it, secure it onto the PCIe adapter using screws. Make sure the SSD is firmly attached to the adapter to prevent any movement.
Step 3: Insert the PCIe Adapter into the Raspberry Pi 5
Carefully insert the PCIe adapter into the PCIe slot on your Raspberry Pi 5. The Raspberry Pi 5 features a PCIe 2.0 x1 slot, so ensure your adapter is compatible with this interface.
Step 4: Power Up and Verify Installation
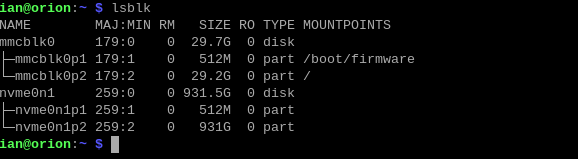
Power up your Raspberry Pi 5 and log in to your operating system. Open a terminal window and run the following command to check if the NVMe SSD is detected:
lsblk
You should see the NVMe SSD listed among the storage devices.
Step 5: Enjoy Enhanced Storage Performance
Congratulations! You’ve successfully installed an NVMe SSD onto your Raspberry Pi 5 via PCIe. Now, you can take advantage of lightning-fast storage speeds for your data-intensive projects, whether it’s media streaming, data analysis, or hosting a web server. You can also boot directly from your new NVMe SSD, so go ahead and Turbocharge Your Raspberry Pi 5: Booting from NVMe SSD, and say goodbye to booting from MicroSD!
Conclusion:
By adding an NVMe SSD to your Raspberry Pi 5 via PCIe, you’ve unlocked a new level of storage performance and flexibility. For astrophotographers, the combination of Raspberry Pi 5 and NVMe SSD opens up a world of possibilities. So go ahead, install your NVMe SSD, and watch your Raspberry Pi 5 soar to new heights of performance!
Pingback: Installing INDI on a Raspberry Pi 5 - ASTROISK