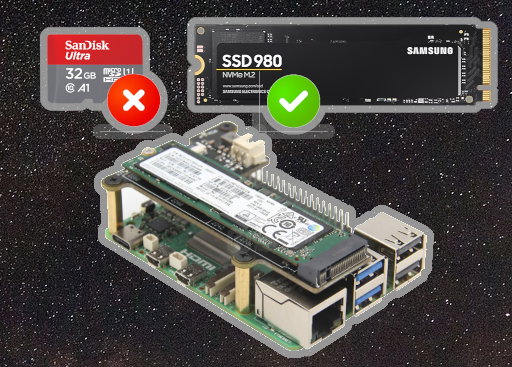
The Raspberry Pi 5 is a powerful single-board computer, but its default boot option, using a microSD card, can sometimes limit performance, especially for applications requiring high-speed data access. Thankfully, Raspberry Pi 5 supports booting from an NVMe SSD, offering significantly faster storage speeds and improving overall system responsiveness. In this guide, we’ll walk you through the steps to boot your Raspberry Pi 5 from an NVMe SSD, unlocking its full potential for a wide range of projects and applications.
Prerequisites:
Before starting, ensure you have the following:
- Raspberry Pi 5 board.
- NVMe SSD with M.2 interface.
- PCIe adapter card compatible with Raspberry Pi 5 (e.g., PCIe 2.0 x1).
- Adequate power supply for both the Raspberry Pi and the NVMe SSD.
- MicroSD card with Raspberry Pi OS (or any other compatible operating system) installed and configured.
- Access to a computer with an SD card reader and internet connection.
Step 1: Prepare the MicroSD Card
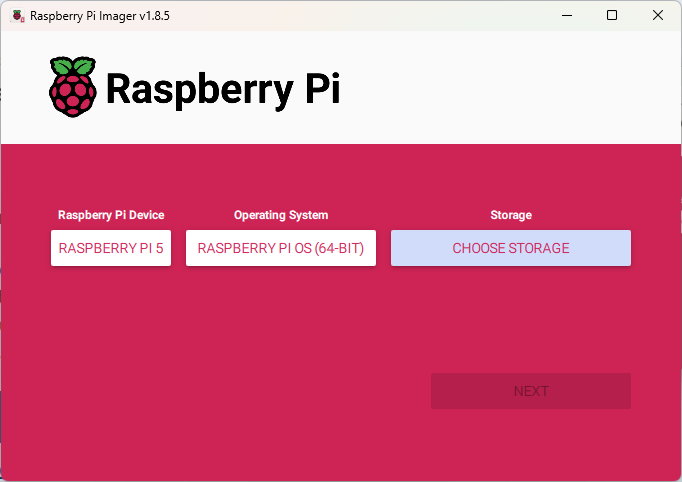
We start by copying the desired Raspberry Pi operating system to an empty microSD card after downloading and installing the Raspberry Pi Imager utility:
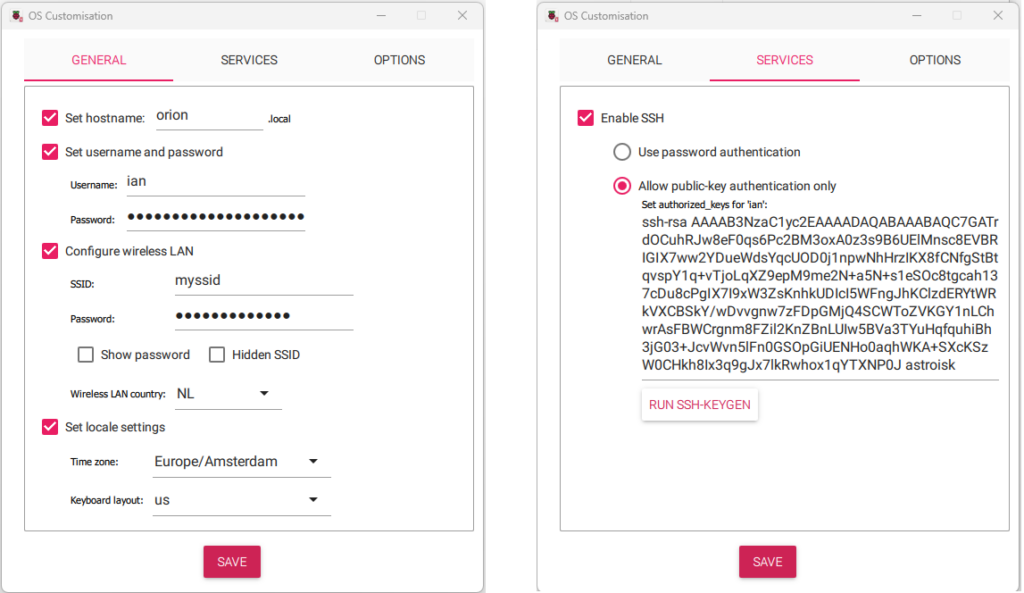
Hit NEXT, then EDIT SETTINGS for any required OS customisations:

Provide the hostname, username, password, wireless network, and locale, then enable the SSH server:
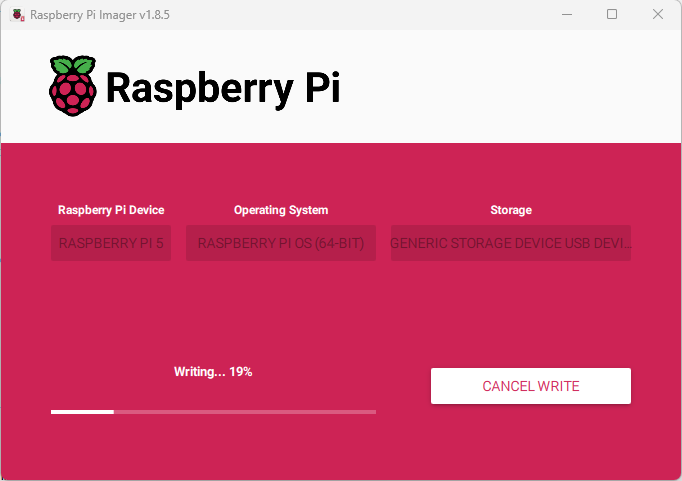
SAVE then YES to continue:

YES again to continue. The operating system copy starts:
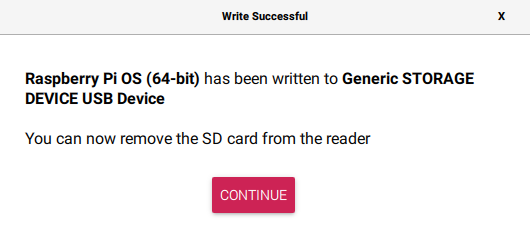
Once the operating system copy is complete, eject the microSD card and insert it into the Raspberry Pi 5.
Step 2: Enable Boot from NVMe on Raspberry Pi 5
Before you can boot from an NVMe SSD, you need to enable the feature in the Raspberry Pi 5’s firmware. To do this, follow these steps:
- Ensure your Raspberry Pi 5 is powered off and disconnected from any power source.
- Insert the microSD card into the Raspberry Pi 5.
- Connect the NVMe SSD via the PCIe adapter. You can follow our guide Unleashing Raspberry Pi 5 Power: Installing NVMe SSD via PCIe for full details of how this is done.
- Power on the Raspberry Pi 5.
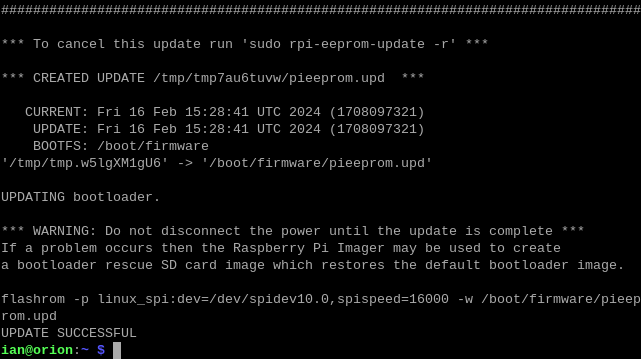
- Open a terminal window and run the following command to update the firmware:
sudo rpi-eeprom-update -d -a
- Reboot the Raspberry Pi 5:
sudo reboot
Step 3: Copy the MicroSD Card to the NVMe SSD
Before you can boot from an NVMe SSD, you first need to copy the Raspberry Pi operating system to it. We can use the inbuilt SD Card Copier utility for this. The utility is located in the Accessories menu of the Raspberry Pi desktop:
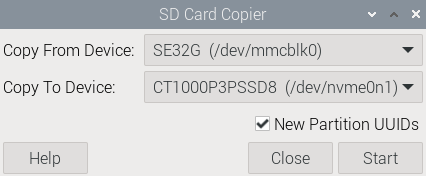
Set the Copy From Device as the MicroSD card and the Copy To Device as the NVMe SSD, and make sure the New Partition UUIDs option is checked, then Start the copy.

Accept the warning to start the copy.

Step 4: Change the Boot Order
To boot the Raspberry Pi 5 from the NVMEe SSD without needing the MicroSD card installed you will first you need to change the boot order so that the NVMe comes first, with the MicroSD card as fall-back in case of misconfiguration:
sudo rpi-eeprom-config --edit
Change the boot order value to BOOT_ORDER=0xf416 – the 6 suffix is the NVMe boot mode.
Add the PCIe probe option PCIE_PROBE=1:
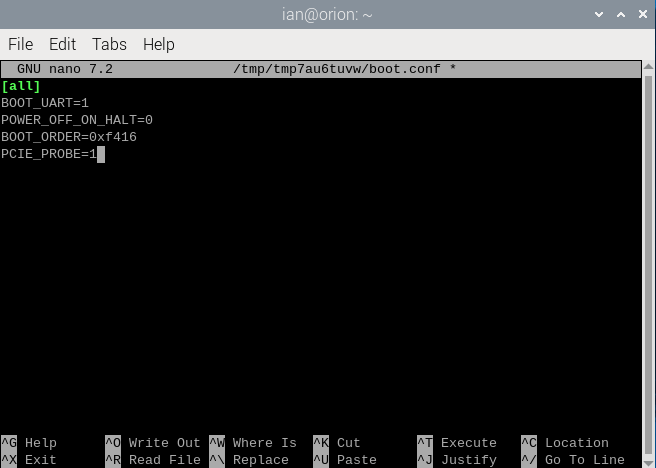
Save and exit with Control + O and Control + X. The update operation takes a few seconds to complete.
You’re now ready to power off your Raspberry Pi 5 and remove the MicroSD card, as you won’t be needing that anymore for booting. When ready, power back on and watch as the boot runs from the NVMe SSD.
Step 5 : Set the PCIe Connection Speed
The Raspberry Pi 5 comes with official support for PCIe Gen 2 speeds, but we’ve found that Gen 3 works just fine and adds even more performance to your already much improved setup. The PCIe connection speed is set in the boot configuration:
sudo nano /boot/firmware/config.txt
Use the cursor keys to move to the very end of the configuration then add two lines for the NVMe configuration:
#NVMe Configuration
dtparam=pciex1_gen=3
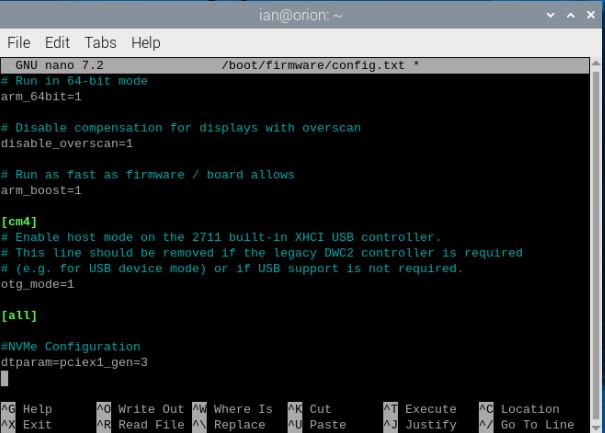
Save and exit with Control + O and Control + X then reboot the Raspberry Pi 5
Step 6: Verify Booting from NVMe SSD
Once the Raspberry Pi 5 boots up, log in to the operating system and verify that it is running from the NVMe SSD correctly by checking the disk usage and performance metrics.
Step 7: Enjoy Improved Performance
Congratulations! You’ve successfully booted your Raspberry Pi 5 from an NVMe SSD, unlocking faster storage speeds and enhancing overall system performance. Installing and running your astronomy applications from the NVMe SSD will provide a significant boost in responsiveness and efficiency.
Conclusion:
By booting your Raspberry Pi 5 from an NVMe SSD, you’ve taken a significant step towards maximizing its performance and capabilities. With faster storage access and improved responsiveness, your Raspberry Pi 5 is now ready to tackle even more demanding tasks and projects. So go ahead, harness the power of NVMe SSDs, and elevate your Raspberry Pi experience to new heights!
Works like a charm !
Running StellarmateOs and Firecapture on Raspberry Pi 5 in an Argon One V3 M.2 NVMe PCie case. Boots very fast from Kingston KC 3000 512 GB . With that, I can use Stellarmate for DSO imaging, and Firecapture for planatary/sun/moon lucky imaging, with one single device. FPS for the ZWO ASI 174 MM showing similar results as with a fast laptop (all USB 3). Fixed an USB traffic issue on the Raspy by using a powered USB hub.
Waiting for clear skies to do some DSO imaging performance tests with large Nikon NEF files on Z7-II and the Atik 490EX mono.
CS,
Ad
Pingback: Install INDI-AllSky on a Raspberry Pi 5 – ASTROISK
Pingback: INDI-AllSky Environment Monitoring with a BME280 Sensor - ASTROISK
Pingback: Install Allsky on a Raspberry Pi 5 - ASTROISK
Pingback: Installing KStars and Ekos on Raspberry Pi 5 - ASTROISK
Pingback: Installing FireCapture on Raspberry Pi 5 - ASTROISK
Pingback: Installing the QHYCCD PoleMaster on a Raspberry Pi 5 - ASTROISK
Pingback: GNU Astronomy Utilities on a Raspberry Pi 5 - ASTROISK
Pingback: Time Lapse Astrophotography with gPhoto2 on Raspberry Pi 5 - ASTROISK
Pingback: Installing Hallo Northern SKY on a Raspberry Pi 5 - ASTROISK
Pingback: Installing SER-Player on a Raspberry Pi 5 - ASTROISK
Pingback: Installing ImPPG on Raspberry Pi 5 - ASTROISK
Pingback: Installing GraXpert on Raspberry Pi 5 - ASTROISK
Pingback: Installing GIMP on Raspberry Pi 5 - ASTROISK
Pingback: Installing PHD2 on a Raspberry Pi 5 - ASTROISK
Pingback: Installing Siril on Raspberry Pi 5 - ASTROISK
Pingback: Installing Astropy on Raspberry Pi 5 - ASTROISK