Whether you’re a seasoned astronomer or an enthusiastic hobbyist, having accurate location data is essential for celestial navigation, astrophotography, and telescope alignment. Fortunately, with the power of Raspberry Pi 5 and INDI (Instrument Neutral Distributed Interface) GPS support, harnessing the wonders of the universe has never been easier. In this guide, we’ll explore how to integrate INDI GPS support using GPSD into a Raspberry Pi 5 for astronomy applications.
This article describes the procedure to install software onto a 64-bit Raspberry Pi 5 with 8GB RAM running Debian GNU/Linux 12 (bookworm) which is booted from a 1TB NVMe SSD drive. This may work fine for other configurations, so please do let us know if it does, or tell us about any issues you faced and detail your configuration. Thanks!
Why Add INDI GPS Support? Adding INDI GPS support to your Raspberry Pi 5 brings several benefits to your astronomy endeavors:
- Precise Location Data: INDI GPS support provides accurate geographic coordinates, enabling precise alignment of telescopes and tracking of celestial objects.
- Time Synchronization: GPS signals include precise time information, allowing synchronization with universal time standards for accurate timing of astronomical events. This also ensures accurate observations.
- Convenience: With INDI support, your Raspberry Pi can seamlessly communicate with astronomical devices, such as telescopes and cameras. This enhances automation and workflow efficiency.
Now, let’s dive into the steps to add INDI GPS support to your Raspberry Pi 5 for astronomy applications.
Prerequisites:
Before diving into the installation process, ensure you have the following:
- Raspberry Pi 5 board with Raspberry Pi OS (or any other compatible operating system) installed and configured.
- For the best possible performance, check out how to Turbocharge Your Raspberry Pi 5: Booting from NVMe SSD.
- GPS module compatible with Raspberry Pi (e.g., U-Blox NEO-6M).
- Stable internet connection for downloading software packages.
- Basic familiarity with the Raspberry Pi environment, including how to open a terminal and run commands.
- INDI server installed and running, just as described in our guide Harnessing Astronomy with Raspberry Pi 5: Installing INDI for Stellar Exploration.
Step 1: Hardware Setup
Connect the GPS module to the Raspberry Pi 5 using GPIO pins or USB interface, ensuring a secure connection. Power off the Raspberry Pi 5 during the hardware setup process to avoid any potential damage.
Step 2: Software Installation
Once you connect the hardware, power on your Raspberry Pi 5 and proceed with the software installation:
Update your Raspberry Pi OS to the latest version:
sudo apt update && sudo apt upgrade
Install the required packages:
sudo apt install gpsd gpsd-clients libgps-dev
Step 3 : Configure the GPS Service:
Determine which interface on the Raspberry Pi 5 the GPS module is using by looking for the device using the device message log:
dmesg
GPS modules connected to a USB port will typically be shown as device /dev/ttyUSB0.
Edit the GPS service configuration file:
sudo nano /etc/default/gpsd
Configure the system to automatically detect the GPS service when a USB port connects. Don’t wait for a client to connect before polling whatever GPS is associated with it. Start and run as a service, and set the device identifier as noted above:
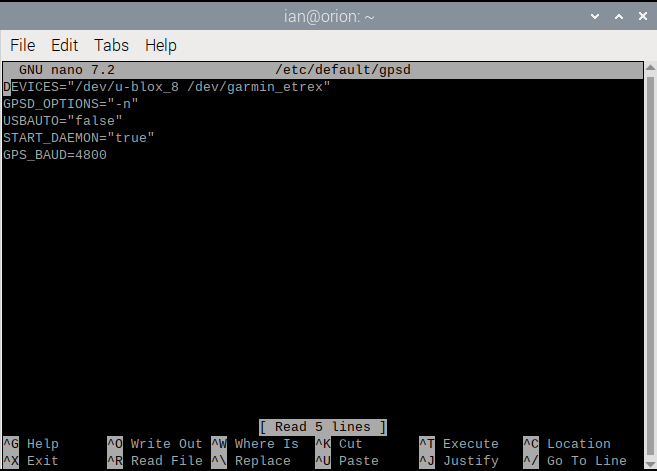
The symbolic links created using udev rules source the GPS device names. See our post about creating udev rules to map USB devices for more information.
Save and exit with Control + O and Control + X. Reboot the Raspberry Pi 5 to apply the configuration.
Step 4: Faking GPS Locations
There may be times when you want to fake your GPS location, such as when you are testing indoors, or you don’t yet have a GPS receiver. This is particularly useful when testing INDI integrations, such as weather applications that rely on GPS position.
GPSD comes preinstalled with a fake location provider. It runs in place of the standard GPSD service, so applications that use GPSD remain unaware that the system fakes the location. It uses a text file containing an NMEA location data stream. This is sourced from an NMEA provider such as NMEAGEN.org:
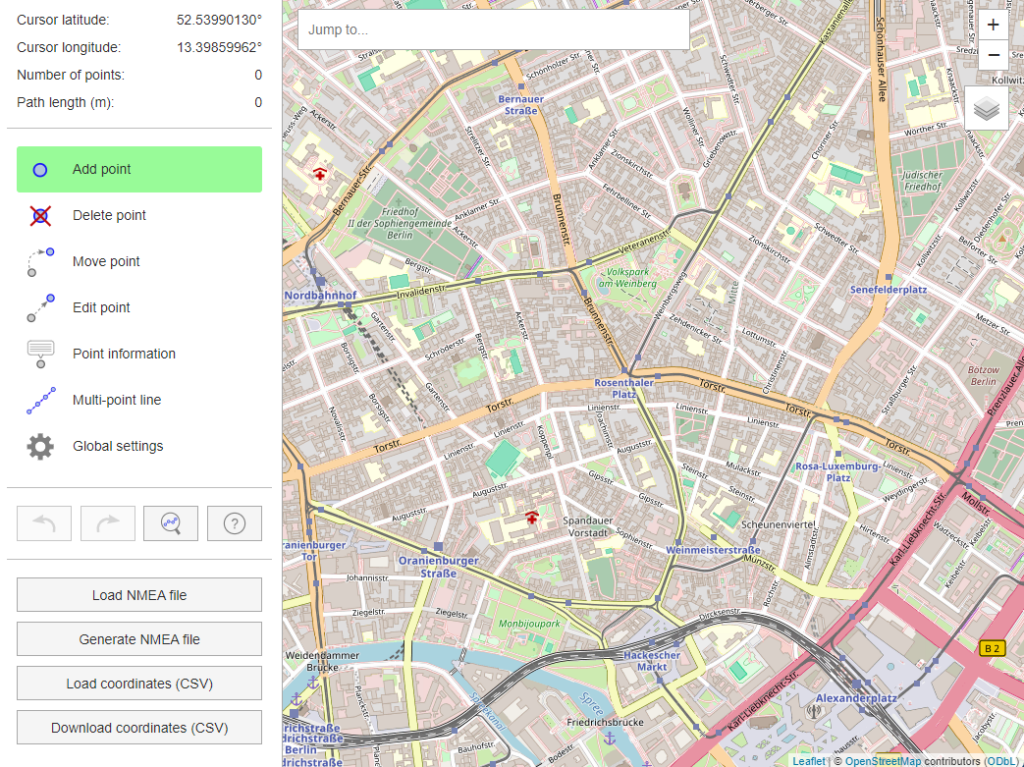
Position the map to your desired location then click to add a point. Hit the Generate NMEA file button to download the point data. Save the downloaded file onto your Raspberry Pi 5, for example in a file ~/backyard.nmea. A single point file contains three lines of NMEA position data:
$GPGGA,081857.921,5231.227,N,01324.282,E,1,12,1.0,0.0,M,0.0,M,,*69
$GPGSA,A,3,01,02,03,04,05,06,07,08,09,10,11,12,1.0,1.0,1.0*30
$GPRMC,081857.921,A,5231.227,N,01324.282,E,,,051024,000.0,W*7F
When you look closer at the $GPGGA and $GPMRC lines, you will see that these display the UTC date and time when the point data was collected:
$GPGGA,081857.921,5231.227,N,01324.282,E,1,12,1.0,0.0,M,0.0,M,,*69
$GPRMC,081857.921,A,5231.227,N,01324.282,E,,,051024,000.0,W*7F
For position data alone, you can leave these as is. However, for time critical applications such as mount control, you should edit these values or take a new point sample at the moment you want to use it.
The fake GPSD server replaces the real one, so we first need to stop the real run if it is running:
sudo systemctl stop gpsd
sudo systemctl stop gpsd.socket
Now we can start the fake GPSD service, reading position data from our NMEA data file:
sudo gpsfake -l -c 1 -S ~/backyard.nmea
The parameters determine the console log output and the rate at which each line is delivered. This closely reflects what you’d see from a regular GPS device.
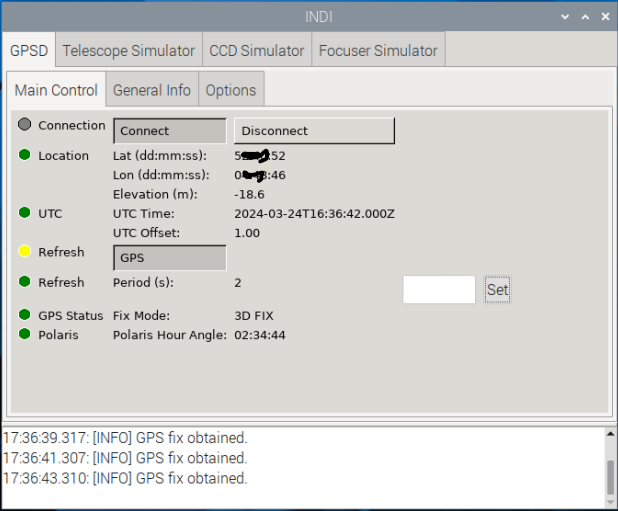
Step 5: Testing GPS Connectivity
After configuring GPSD, test GPS connectivity using the following command:
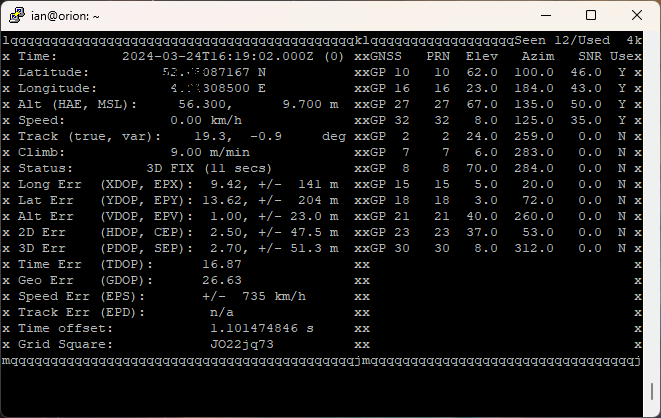
cgps -s
This command should display satellite information, confirming that the GPS module is functioning correctly and receiving signals.
The installation of the GPSD package also created a desktop program called XGPS. You can find it in the Accessories menu or start it from the command line:
xgps

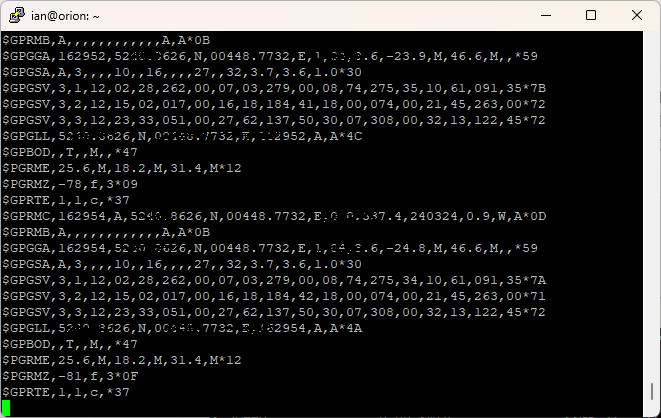
You can view the raw position data directly in the console, exactly as you receive it from the GPS device. Use the following command:
gpspipe -r
The -r switch produces output in NMEA format:
Step 6: Installing INDI GPS Driver
INDI support for GPSD is provided by a 3rd party INDI package. This is compiled from source code. The GPSD package installation assumes you already have installed INDI server by following our guide Harnessing Astronomy with Raspberry Pi 5: Installing INDI for Stellar Exploration. The 3rd party GPSD driver is then added as follows:
mkdir -p ~/Projects/indi-gpsd/tmp
cd ~/Projects/indi-gpsd/tmp
cmake -DCMAKE_INSTALL_PREFIX=/usr -DCMAKE_BUILD_TYPE=Debug ~/Projects/indi-3rdparty/indi-gpsd
make -j4
sudo make install
Step 7: Configuration and Integration
Once the GPS device and a working driver is installed, configure INDI to use the GPS driver:
- Open your preferred INDI client software (e.g., INDIGui, KStars, Ekos).
- Navigate to the device configuration settings.
- Add a new GPS device and specify the connection parameters (e.g., device port).
- Save the configuration and connect to the GPS device.
Step 8: Enhancing Your Astronomy Experience
With INDI GPS support enabled on your Raspberry Pi 5, you’re ready to elevate your astronomy experience:
- Telescope Alignment: Achieve precise alignment of your telescope using accurate location data provided by the GPS module.
- Astrophotography: Improve the accuracy of astrophotography setups by ensuring precise time synchronization and location information.
- Observing Sessions: Enhance your observing sessions by automating tasks such as telescope slewing and target tracking based on GPS coordinates.
Conclusion:
By integrating INDI GPS support into your Raspberry Pi 5 for astronomy applications, you gain access to a powerful tool for precise celestial navigation and observation. Whether you’re exploring the cosmos from your backyard or conducting advanced astrophotography projects, the combination of Raspberry Pi 5 and INDI GPS support opens up a universe of possibilities for astronomers of all levels. Start your journey today and unlock the wonders of the night sky with the aid of INDI GPS technology.