Are you looking to turn your Raspberry Pi 5 and Raspberry Pi HQ Camera into a powerful, feature-rich all-sky camera? Allsky, from Thomas Jacquin and the Allsky Team, is an excellent open-source software solution for capturing and processing images of the night sky using an AllSky camera setup. In this blog post, we will guide you through the process of setting up Allsky on a Raspberry Pi 5 with a Raspberry Pi HQ Camera, step by step.
This article describes a procedure to install software on a Raspberry Pi 5 with 8G RAM running Raspberry Pi OS (64-bit) (Debian v.12 bookworm) booted directly from a 1TB NVMe SSD PCIe drive. This procedure may work for other configurations, so please do let us know if it does, or tell us about any issues you faced and your configuration. Thanks!
Main Features
1. Real-Time Image Capture
- Captures images continuously from a compatible camera (e.g., Raspberry Pi cameras, ZWO ASI cameras).
- Adjusts exposure and gain settings dynamically for optimal image capture in varying light conditions.
2. Time-Lapse Video Creation
- Automatically generates time-lapse videos from the images captured during the night.
- Configurable settings for video resolution and playback speed.
3. Web Interface
- Provides a user-friendly web interface to control the camera, view live previews, and access captured images and videos.
- Allows remote access to the AllSky system over a local network or the internet.
4. Image Overlay and Annotation
- Adds customizable overlays to images, such as date, time, location, and logos.
- Enables astronomers to annotate images for better documentation.
5. Star Detection and Meteor Tracking
- Detects stars and meteors in the captured frames.
- You can integrate it with other software or scripts for more advanced astronomical analysis.
6. Image Upload and Sharing
- Supports automated uploading of images and videos to platforms like a personal website, FTP servers, or social media.
- Includes templates for displaying images and time-lapses on a website.
7. Customizable Settings
- Wide range of configuration options for camera settings, overlays, file storage, and processing.
- Configuration files allow advanced users to fine-tune the behavior of the software.
8. Compatible with Multiple Cameras
- Works with Raspberry Pi cameras and many USB-connected cameras such as ZWO ASI models.
- Supports cameras capable of long exposures for astrophotography.
9. Open-Source and Community Support
- Completely open-source, allowing users to modify and adapt the software to their needs.
- Backed by an active community of enthusiasts and developers who contribute to its development and troubleshooting.
10. Efficient Resource Usage
- Optimized for running on resource-constrained devices like the Raspberry Pi.
- Minimal hardware requirements, making it accessible for hobbyist astronomers.
11. Day/Night Modes
- Automatically switches between day and night modes, adjusting settings to prevent overexposure during daylight hours.
- Supports the capture of daytime sky images for cloud monitoring or other purposes.
These features make AllSky a versatile and widely used choice for amateur astronomers and enthusiasts looking to monitor and record the night sky.
Prerequisites
- Raspberry Pi 5 board with Raspberry Pi OS (or any other compatible operating system) installed and configured.
- Raspberry Pi High Quality Camera, with its 12.3 megapixel Sony IMX477 sensor, 7.9mm diagonal image size, and back-illuminated sensor architecture, with adjustable back focus., making it an ideal camera for use in AllSky projects.
- For the best possible performance, check out how to Turbocharge Your Raspberry Pi 5: Booting from NVMe SSD.
- Stable internet connection for downloading software packages.
- Basic familiarity with the Raspberry Pi environment, including how to open a terminal and run commands.
Step 1: Prepare Your Raspberry Pi 5
Begin by ensuring that your Raspberry Pi 5 is up to date. Open a terminal or SSH session and run the following commands:
sudo apt update && sudo apt upgrade
This will update the package lists and upgrade any installed packages to their latest versions.
Step 2: Connect and Verify Pi HQ Camera
Connect your Pi HQ camera, or whichever camera you choose, using the CSI/DSI connector. Note that the Raspberry Pi 5 has a smaller connection port than earlier Pi models, so you may need an adapter cable. The Raspberry Pi 5 should automatically recognise the camera, without the need to enable anything in the system configuration.
With the camera connected, enter the following command:
libcamera-hello --list-cameras
This should respond with the camera’s details:
Available cameras
-----------------
0 : imx477 [4056x3040 12-bit RGGB] (/base/axi/pcie@120000/rp1/i2c@80000/imx477@1a)
    Modes: 'SRGGB10_CSI2P' : 1332x990 [120.05 fps - (696, 528)/2664x1980 crop]
           'SRGGB12_CSI2P' : 2028x1080 [50.03 fps - (0, 440)/4056x2160 crop]
                             2028x1520 [40.01 fps - (0, 0)/4056x3040 crop]
                             4056x3040 [10.00 fps - (0, 0)/4056x3040 crop]
These details are needed for configuring Allsky.
Step 3: Download and Install Allsky
This guide assumes a first time installation of Allsky. If a version of Allsky is already installed then it should first be saved or removed.
Create a project directory into which the source will be downloaded:
mkdir ~/Projects
cd ~/Projects
The latest version of Allsky is cloned and installed from the official Github repository:
git clone --depth=1 --recursive https://github.com/AllskyTeam/allsky.git
Run the installation script:
cd ~/Projects/allsky
./install.sh

Some pre-requisites are installed, followed by a version check:

The system has already set the default locale for character encoding, which works fine in most cases:

Confirm camera connection:

The Raspberry Pi 5 is more than capable of storing Allsky’s temporary files in memory, so select the option to do so:

The installation continues with the webserver, dependencies, commands, and variables. Reboot:


The script is resumed once rebooted:
cd ~/Projects/allsky
./install.sh

The Welcome Back message explains that this next part will take some time, before proceeding to prepare install all the required packages. For me this took about two minutes. Next up, your sites latitude and longitude are required:


You may or may not get a message about the old WebUI location. I already have another service installed, so I get the message:

Next, we get our new Allsky web server URL details, and a request for another reboot:

And finally, before rebooting, a message about our camera’s default settings:

Step 4: Configure Allsky
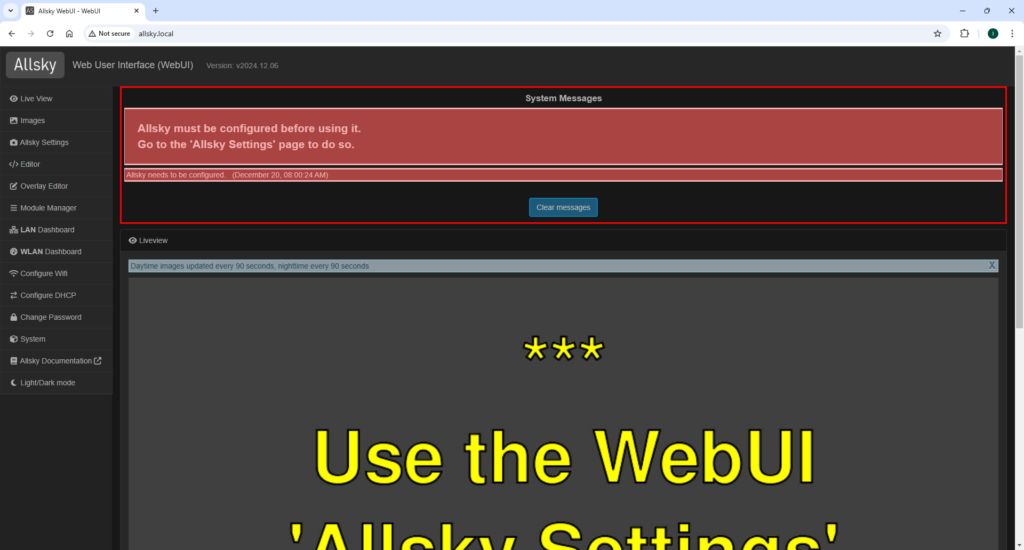
Once Allsky is installed and the Raspberry Pi 5 rebooted, the web portal should be reachable at the above mentioned WebUI address:

There are many configuration options available, all described in the Allsky documentation.
Conclusion
Congratulations! You’ve successfully set up Allsky on your Raspberry Pi 5 with the Raspberry Pi HQ Camera. Happy stargazing!
