Are you a passionate astronomer looking to delve deeper into astrophotography? Do you want to capture stunning images of celestial objects using your telescope? If so, installing Ain INDIGO Imager on a Raspberry Pi 5 can unlock a world of possibilities for you. In this guide, we’ll walk you through the steps to set up Ain INDIGO Imager on your Raspberry Pi 5 and begin capturing breathtaking images of the cosmos.
What is Ain INDIGO Imager?
INDIGO is an open-source platform designed specifically for astronomy enthusiasts. It offers a suite of tools and drivers for controlling various astronomical devices, including telescopes, cameras, and mounts. Ain INDIGO Imager is an all-in-one application for imaging, auto focusing, auto guiding, telescope control, plate solving and image viewing.
This article describes a procedure to install software on a Raspberry Pi 5 with 8G RAM running Raspberry Pi OS (64-bit) (Debian v.12 bookworm) booted directly from a 1TB NVMe SSD PCIe drive. This procedure may work for other configurations, so please do let us know if it does, or tell us about any issues you faced and your configuration. Thanks!
Prerequisites
- Raspberry Pi 5 board with Raspberry Pi OS (or any other compatible operating system) installed and configured.
- For the best possible performance, check out how to Turbocharge Your Raspberry Pi 5: Booting from NVMe SSD.
- Stable internet connection for downloading software packages.
- Basic familiarity with the Raspberry Pi environment, including how to open a terminal and run commands.
- An INDIGO Server instance running locally or on another system accessible from the network. If haven’t already done so, check out our guide Building Your Own Astronomy Server: Installing INDIGO on Raspberry Pi 5.
Step 1: Add the INDIGO Repository to the Repository Sources
The INDIGO package is downloaded from a repository that must be added to the Advanced Packaging Tool (APT) repository sources list. The repository source definition is added as a new file in the sources lists directory using the following command:
sudo nano /etc/apt/sources.list.d/indigo.list
Add the main package repository location to the file:
deb [trusted=yes] https://indigo-astronomy.github.io/indigo_ppa/ppa indigo main
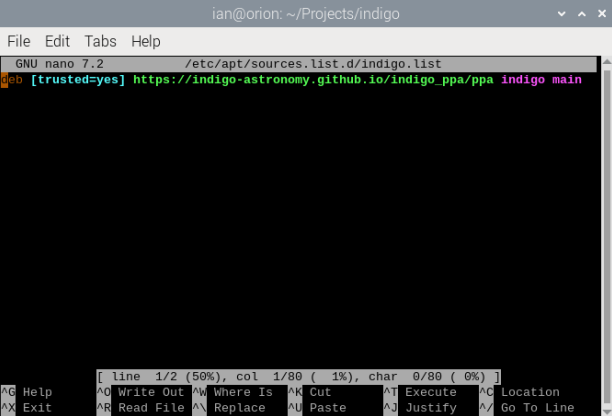
Save and exit with Control + O and Control + X.
Step 2: Update Your Raspberry Pi
Begin by ensuring your Raspberry Pi 5 is up to date. Open a terminal window and run the following commands:
sudo apt update && sudo apt upgrade
This will update the package lists and upgrade any installed packages to their latest versions, including the newly added INDIGO package repository.
Step 3: Install Ain INDIGO Imager Suite
Once the package lists are updated, you can install Ain INDIGO Imager Suite by executing the following command:
sudo apt install ain-imager
Step 4: Launch Ain INDIGO Imager
With Ain INDIGO Imager successfully installed, you can launch it from the desktop environment menu or from a terminal by typing:
ain_imager
This should launch the Ain INDIGO Imager application:
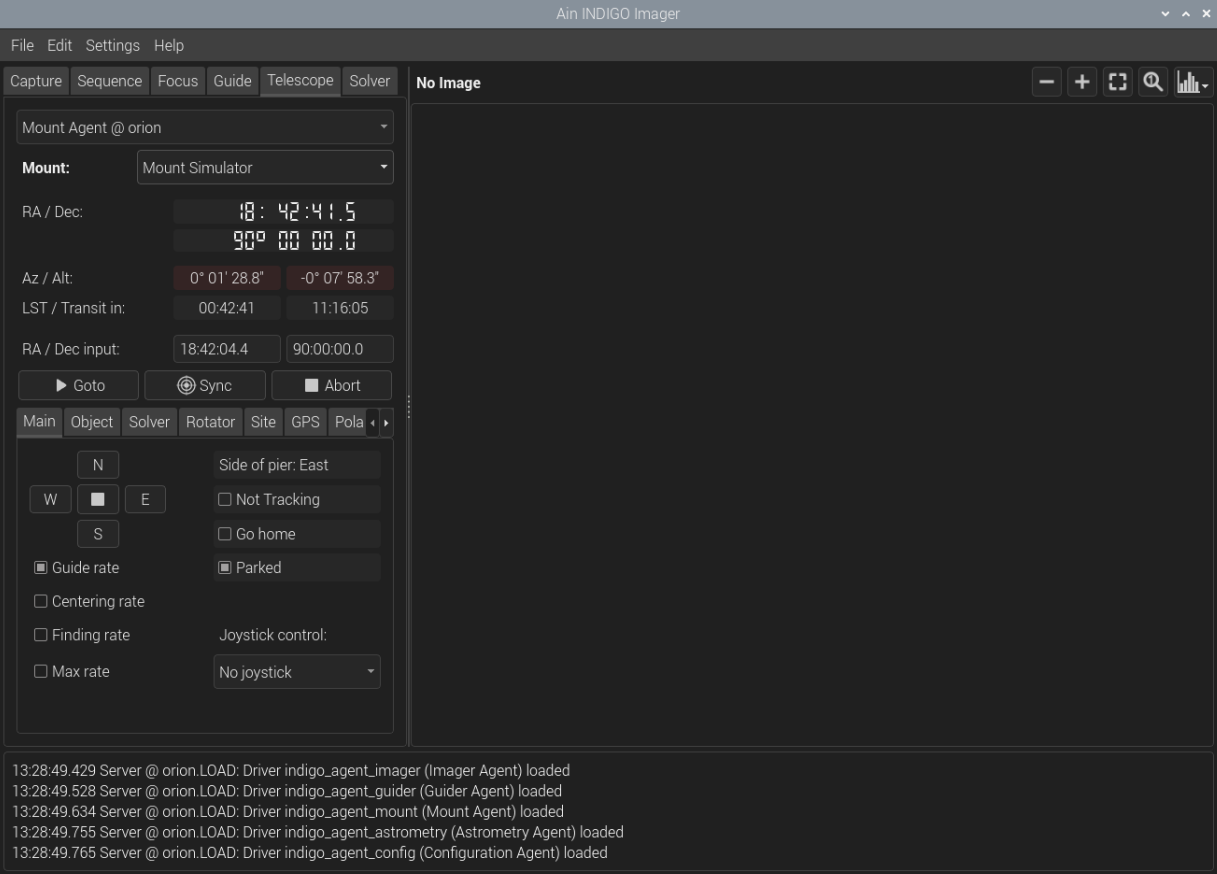
The application will immediately connect to a locally running INDI Server and load up the devices known to it. Additional devices are added via the File menu which has options to access the INDI Control Panel.
There are many more options to explore, and there is an extensive Ain INDIGO Imager User Guide available in GitHub.
Once configured, you’re ready to start capturing images of the night sky. Use the INDIGO client to set exposure times, adjust image settings, and initiate imaging sessions. Experiment with different exposure settings and camera configurations to capture the perfect shot of your favorite celestial objects.
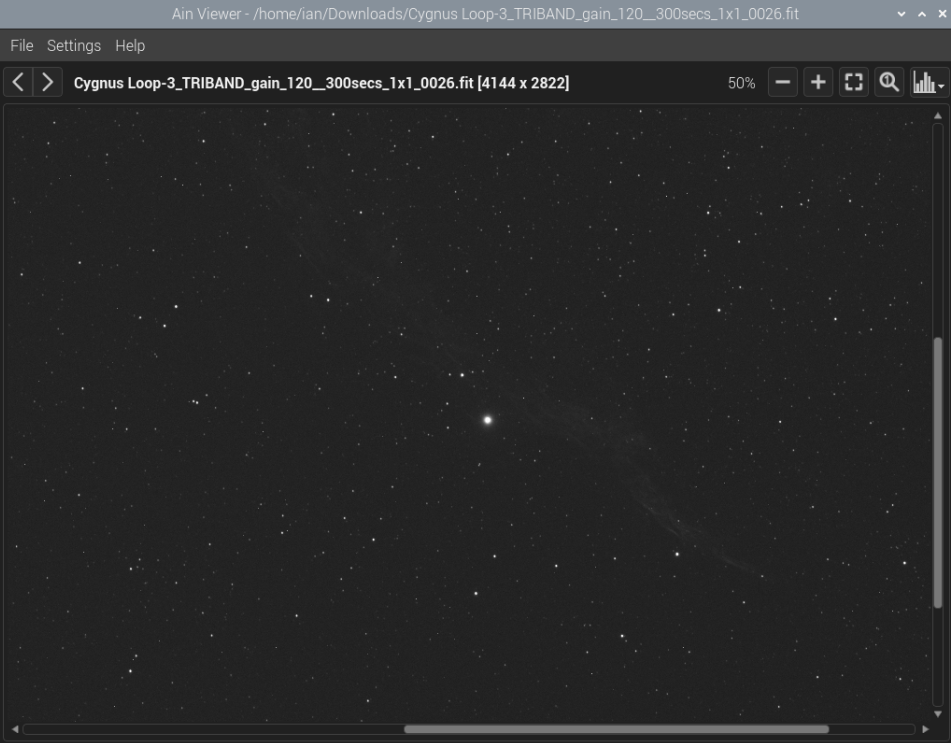
Step 5: Ain INDIGO Image Viewer
The Ain INDIGO Imager installation includes a simple image viewer that is launched from the desktop environment menu or from a terminal by typing:
ain_viewer
This opens the Ain INDIGO Image Viewer application:
Conclusion
By installing Ain INDIGO Imager Suite on your Raspberry Pi 5, you can transform your astronomy setup into a powerful imaging system capable of capturing breathtaking images of the cosmos. Whether you’re a seasoned astrophotographer or a beginner looking to explore the wonders of the universe, INDIGO provides the tools you need to take your hobby to new heights. So, gather your equipment, set up your Raspberry Pi, and start capturing stunning images of the night sky today!