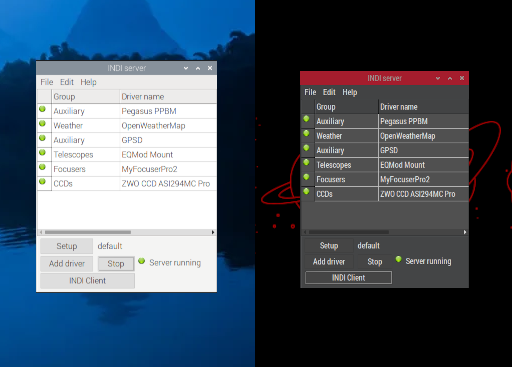
If you’ve recently powered on your new Raspberry Pi 5 running Bookworm, you may have noticed that the default desktop environment is… functional, but not exactly inspiring. The light theme and standard fonts lack the polish and personality that can really bring the hardware to life, especially if you’re using your Pi for something more specialized—like astrophotography. One way to enhance the visual appeal is by switching to a dark theme, which can make the interface much more pleasing to the eye.
For those working under the stars, a glaring white desktop can be a major issue. Night vision is crucial in astrophotography, as bright screens can interfere with your ability to see faint celestial objects. Luckily, Raspberry Pi’s Bookworm OS offers simple ways to transform the interface, making it easier on the eyes during late-night stargazing sessions. Let’s explore how you can activate the new dark theme and change the default font and colour scheme for a more polished, night-friendly desktop.
Activating the Dark Theme: Ideal for Night-Vision Preservation
Bookworm comes with a built-in dark theme, but it’s not applied by default. For astrophotographers, this is a must-use feature. A dark-themed desktop helps preserve your night vision by reducing the strain caused by bright light, allowing your eyes to stay more adapted to the darkness—a crucial aspect when you’re observing dim stars or capturing long-exposure photographs of the night sky.
To enable the dark theme:
- Click on the Raspberry Pi icon in the top-left corner (the Pi menu).
- Go to Preferences > Appearance Settings.
- In the System tab, click on the Dark radio button.
- Click OK and enjoy the smoother, more eye-friendly look of the dark theme.

Improving Readability with an Alternate Piboto Font
Along with the dark theme, adjusting the system’s fonts can significantly improve readability, especially on a dark background.
Piboto is a custom font family designed specifically for Raspberry Pi, and the condensed version is ideal when you need to fit more information on your screen without sacrificing clarity. This is especially handy if you’re working with astronomy software or monitoring multiple graphs and data feeds simultaneously.
Here’s how to change the font:
- Click on the Raspberry Pi icon in the top-left corner (the Pi menu).
- Go to Preferences > Appearance Settings.
- In the System tab, click in the Font box to open the Pick A Font selection list.
- Scroll down the list and select Piboto Condensed Regular. Leaving the default size at 12 works well.
- Click Select to lock in the font and size.
- Click OK to apply.

Tweaking the Dark Theme for Night-Vision
You should already see a marked improvement in the visual layout, but there’s more we can do to help with our night-vision. With the overall dark theme set, we can change the colours and background of the Desktop, Taskbar, and System highlights to night-vision friendly reds and grays. The settings I use are a personal choice, so feel free to experiment with different values until you achieve something you like!
Desktop Dark Theme
To change the Desktop background and colours:
- Click on the Raspberry Pi icon in the top-left corner (the Pi menu).
- Go to Preferences > Appearance Settings.
- In the Desktop tab, click in the Layout box and select No image from the list. Alternatively, browse for a Picture that is better suited for night-vision, that you found and downloaded. I like this one, which the author has made available for use.
- Set the background Colour to black, and the Text Colour to a middle grey, the darker the better.
- Uncheck the three boxes for Documents, Wastebasket, and External Disks, to remove those bright icons from the desktop.
- Click OK to apply.


Taskbar Dark Theme
To change the Taskbar background and colours:
- Click on the Raspberry Pi icon in the top-left corner (the Pi menu).
- Go to Preferences > Appearance Settings.
- In the Taskbar tab, change the taskbar icon size and position to your preference. Smaller icons at the bottom of the screen work better.
- Set the background Colour to a darker grey, and the Text Colour to a middle grey.
- Click OK to apply.

System Dark Theme
To change the System highlight colours:
- Click on the Raspberry Pi icon in the top-left corner (the Pi menu).
- Go to Preferences > Appearance Settings.
- In the System tab, select your prefered Mouse Cursor size. Smaller cursors work better.
- Set the Highlight Colour to a dark red, and the Highlight Text Colour to a middle grey.
- Click OK to apply.

Conclusion
The default Raspberry Pi 5 desktop running Bookworm may feel uninspired at first, but with a few simple tweaks—activating the dark theme and switching the font to Piboto Condensed Regular 12—you can transform it into a sleek, modern, and highly functional workspace. These changes are especially beneficial for astrophotographers, helping preserve night vision and providing a smoother, more efficient desktop experience. With these adjustments, your Raspberry Pi is not only a powerful computing tool but also an ideal companion for stargazing and astrophotography.
Clear skies!
