
The Raspberry Pi 5 is a powerful and affordable mini-computer that offers an excellent platform for a wide range of applications, including scientific computing and data analysis. One particularly exciting application is using the Raspberry Pi for astronomy projects. With the Python library Astropy, you can perform advanced astronomical computations and analyze celestial data right from your Raspberry Pi. In this blog post, we’ll guide you through setting up Astropy on your Raspberry Pi 5 and demonstrate some basic usage examples.
What is Astropy?
Astropy is a comprehensive Python library designed for astronomy. It provides tools for handling and analyzing astronomical data, including functionality for:
- Celestial coordinate transformations
- Time and date handling
- Manipulating and visualizing astronomical data
- Accessing online databases and catalogs
Astropy is widely used in the astronomy community, making it an excellent choice for both amateur astronomers and professional researchers.
Getting Started with Astropy on Raspberry Pi 5
In this guide, we’ll walk you through the process of installing and using Astropy on your Raspberry Pi 5.
This article describes a procedure to install software on a Raspberry Pi 5 with 8G RAM running Raspberry Pi OS (64-bit) (Debian v.12 bookworm) booted directly from a 1TB NVMe SSD PCIe drive. This procedure may work for other configurations, so please do let us know if it does, or tell us about any issues you faced and your configuration. Thanks!
Prerequisites
- Raspberry Pi 5 board with Raspberry Pi OS (or any other compatible operating system) installed and configured.
- For the best possible performance, check out how to Turbocharge Your Raspberry Pi 5: Booting from NVMe SSD.
- Stable internet connection for downloading software packages.
- Basic familiarity with the Raspberry Pi environment, including how to open a terminal and run commands.
Step 1: Check Python Version
Raspberry Pi OS comes with Python pre-installed. To check the installed version of Python, run:
python --version
Python 3.11.2
Step 2: Setting Up a Python Virtual Environment
A virtual environment allows you to create an isolated space for your Python projects, preventing package conflicts. Navigate to your project directory and create a virtual environment:
mkdir -p ~/Projects/astropy
cd ~/Projects/astropy
python -m venv astropy-env
Step 3: Activate the Virtual Environment
Activate the virtual environment using the following command:
source astropy-env/bin/activate
Your terminal prompt will change to indicate that the virtual environment is active. You can now install packages within this environment without affecting the global Python installation.
Step 4: Installing Astropy
Now we can add the Astropy library to our project virtual environment:
pip install astropy
This command will download and install the latest version of Astropy and its dependencies.
Step 5: Verifying the Installation
To verify that Astropy is installed correctly, open a Python shell by typing python in your terminal and then try importing Astropy:
import astropy
print(astropy.__version__)
If you see the version number of Astropy without any errors, the installation was successful. Use CTRL-D to close the Python shell.
Step 6: Deactivate the Virtual Environment
To deactivate your project’s Python virtual environment, simply run:
deactivate
Your terminal prompt will change to indicate that the project’s virtual environment is no longer active.
Using Astropy: A Quick Tutorial
Now that you know how to setup and activate a Python virtual environment for your project, and install Astropy into that project, let’s explore some basic functionalities. You can try these examples directly from the Python shell, or for longer examples, by creating a Python script using your favourite editor, save the script with a .py extension, then run the script with the Python command e.g.:
nano hello.py
Enter the following code:
print("Hello, Raspberry Pi 5!")
Save the file and exit the editor. To run the script, use the following command:
python hello.py
Example 1: Converting Coordinates
Astropy makes it easy to convert between different celestial coordinate systems. For instance, let’s convert from equatorial coordinates (RA, Dec) to galactic coordinates:
from astropy.coordinates import SkyCoord
import astropy.units as u

# Define coordinates in RA and Dec
ra_dec = SkyCoord(ra=10.684*u.deg, dec=41.269*u.deg, frame='icrs')

# Convert to galactic coordinates
galactic = ra_dec.galactic
print(galactic)
Example 2: Units and Quantities
Astropy provides a robust framework for dealing with physical units, making it easy to convert between different units and perform calculations with proper dimensional analysis.
from astropy import units as u

# Define some quantities
distance = 5 * u.lightyear
time = 2 * u.year

# Perform calculations
speed = distance / time
print(speed)
Example 3: Constants
The astropy.constants module provides access to a wide range of physical and astronomical constants.
from astropy.constants import c

# Speed of light in vacuum
print(c)
Example 4: Time
The astropy.time module is designed for precise time manipulation and conversion.
from astropy.time import Time

# Define a time object
time = Time('2024-06-26T12:00:00', format='isot', scale='utc')

# Convert to Julian Date
julian_date = time.jd
print(julian_date)
Example 5: Table
The astropy.table module allows for easy manipulation of tabular data.
from astropy.time import Time

# Define a time object
time = Time('2024-06-26T12:00:00', format='isot', scale='utc')

# Convert to Julian Date
julian_date = time.jd
print(julian_date)
Example 6: FITS File Handling
Astropy can read from and write to FITS (Flexible Image Transport System) files, which are commonly used in astronomy.
from astropy.io import fits

# Open a FITS file
hdul = fits.open('example.fits')

# Access the data
data = hdul[0].data
print(data)
Example 7: Working with Time and Dates
Astropy provides robust support for time and date manipulations, which are crucial in astronomy:
from astropy.time import Time

# Create a Time object
t = Time('2024-06-26T12:00:00', format='isot', scale='utc')

# Convert to Julian Date
print(t.jd)

# Find the current time
now = Time.now()
print(now)
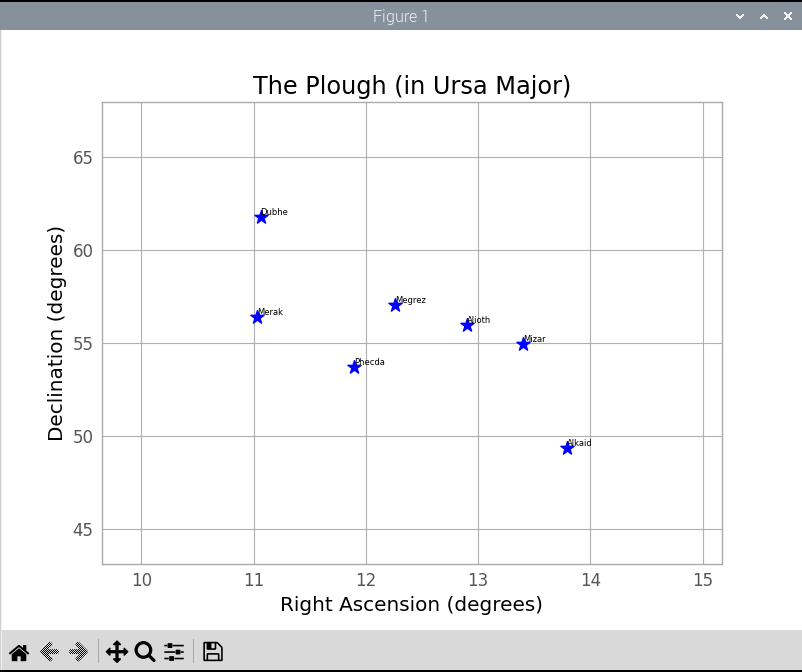
Practical Example: Plotting a Star Field
Let’s put some of these functionalities together and create a plot of a star field using Astropy and Matplotlib. First, we need to install Matplotlib:
pip install matplotlib
Then write our script:
import matplotlib.pyplot as plt
from astropy.coordinates import SkyCoord
import astropy.units as u
from astropy.visualization import astropy_mpl_style
plt.style.use(astropy_mpl_style)

# Define coordinates for a few stars
ra = [11.0622, 11.0306, 11.8972, 12.2572, 12.9006, 13.7922, 13.3989] * u.degree
dec = [61.7511, 56.3825, 53.6947, 57.0325, 55.9597, 49.3133, 54.9253] * u.degree
n = ['Dubhe', 'Merak', 'Phecda', 'Megrez', 'Alioth', 'Alkaid', 'Mizar']

coordinates = SkyCoord(ra=ra, dec=dec, frame='icrs')

# Plot the stars
plt.figure()
plt.margins(x=0.5, y=0.5)
plt.scatter(coordinates.ra.deg, coordinates.dec.deg, s=100, color='blue', marker='*')

for i, txt in enumerate(n):
   plt.annotate(txt, (coordinates.ra[i].deg, coordinates.dec[i].deg), ha='left', va='bottom', size=6)

plt.xlabel('Right Ascension (degrees)')
plt.ylabel('Declination (degrees)')
plt.title('The Plough (in Ursa Major)')
plt.show()
Conclusion
Astropy is a versatile and powerful library that can significantly enhance your work in astronomy. By providing tools for handling units, coordinates, time, tabular data, and FITS files, Astropy allows you to focus on your research rather than the intricacies of data manipulation. Whether you’re analyzing celestial coordinates or plotting star fields, Astropy has you covered.
Explore more about Astropy and its extensive documentation here. Happy stargazing!