Astrophotography generates large files such as RAW and FITS images, SER videos, and processed data. If you’re using a Raspberry Pi 5 as a control hub for your astrophotography equipment, managing these files across your home network can be challenging without proper sharing protocols. Samba, a free software suite, allows seamless file sharing between Linux and Windows systems. By setting up Samba on your Raspberry Pi, you can easily share and access astrophotography files on a Windows network.
This guide will walk you through the steps to install and configure Samba on your Raspberry Pi 5 to efficiently manage and share your astrophotography files.
Prerequisites
To get started, ensure you have the following:
- Raspberry Pi 5 with Raspberry Pi OS installed and updated.
- Astrophotography files or any other data stored on the Raspberry Pi.
- Windows PC(s) on the same local network.
- A stable network connection (either Wi-Fi or Ethernet).
Step 1: Update Your Raspberry Pi
Before installing Samba, ensure that your Raspberry Pi is up to date. Open a terminal on your Pi and run the following commands:
sudo apt update && sudo apt upgrade
This will ensure all existing software packages are up to date, minimizing the risk of installation issues.
Step 2: Install Samba on Raspberry Pi
Samba is available in the default Raspberry Pi OS repository, so installation is straightforward. In the terminal, enter the following command to install Samba and related packages:
sudo apt install samba samba-common-bin
This command installs Samba and additional tools required to manage and configure file shares.
Step 3: Create a Folder for Sharing
Once Samba is installed, you need to configure it to share specific folders. Typically, you’ll want to share the folder where your astrophotography files (images, video, etc.) are stored. If you don’t already have a folder where your astrophotography files are stored, create one:
mkdir -p /home/ian/astrofiles
Place your astrophotography files (or set your astrophotography software, like INDI, to store data) in this folder.
Ensure that the astrofiles directory is accessible by Samba. Run the following command to set the correct permissions:
sudo chmod 775 /home/ian/astrofiles
This allows read, write, and execute permissions for the folder, ensuring proper access over the network.
Step 4: Edit Samba Configuration File
Samba’s configuration is stored in the /etc/samba/smb.conf file. To configure your shared folder, open this file in a text editor:
sudo nano /etc/samba/smb.conf
Scroll to the bottom of the file and add the following lines to configure your shared directory:
[astrofiles]
   path = /home/ian/astrofiles
   browseable = yes
   read only = no
   writable = yes
   guest ok = yes
   create mask = 0775
   directory mask = 0775
- [AstroFiles]: This is the name of the shared folder that will appear on your network.
- path: This is the path to the folder you want to share.
- browseable = yes: Allows the folder to appear in the network browser.
- read only = no: Allows files to be written to the share.
- guest ok = yes: Allows access to the share without needing a username and password (optional; adjust as needed for security).
Save the file by pressing CTRL + X, then Y to confirm, and Enter to exit.
Step 5: Create a Samba User
The latest Windows operating systems only support password-protected file sharing, so you need to create a Samba user:
sudo smbpasswd -a ian
Enter the password you want to use. This adds the Raspberry Pi user (ian) to the Samba user list, allowing password-protected access to the shared folder.
Step 6: Restart Samba Service
After configuring Samba, restart the service to apply the changes:
sudo systemctl restart smbd
You can also enable Samba to start automatically upon boot:
sudo systemctl enable smbd
Step 7: Access the Shared Folder from Windows
Now that Samba is configured and running on your Raspberry Pi, you can access the shared folder from any Windows machine on your network.
Open File Explorer on your Windows machine. In the address bar, type:
\\192.168.178.115\astrofiles
Windows will prompt you for a username and password. Use the Samba username (e.g., ian) and the password you created earlier with smbpasswd. Once connected, the folder will open in File Explorer, and you can access your astrophotography files just like any other shared network folder.
Step 8: Map the Network Drive (Optional)
For easier access, you can map the shared folder as a network drive on your Windows PC:
- Right-click on This PC or My Computer and select Map Network Drive.
- Choose a drive letter (e.g., Z:).
- In the Folder field, type the Pi’s network path:
\\192.168.178.115\astrofiles - Check Reconnect at sign-in if you want the drive to be available automatically each time you log in.
- Click Finish.
This will create a new drive in File Explorer, making it easy to access your astrophotography files directly.
Step 9: Allow the Raspberry Pi 5 to be Discoverable by Windows
Accessing the Samba file shares requires you to remember the IP address of the Raspberry Pi 5 and you need to remap the drives when the IP address changes. To make the Raspberry Pi 5 discoverable on a Windows network we need to install a discovery service. For the Raspberry Pi 5, we can use the Web Service Discovery host daemon wsdd:
sudo apt install wsdd
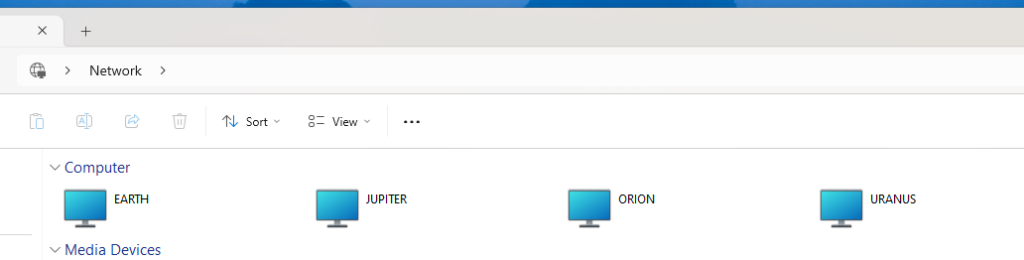
The Raspberry Pi 5 now appears in Windows Explorer when browsing the Network:
Step 10: Working With Files in the Home Folder
Creating and sharing named folders is the securest way to share files between a Raspberry Pi 5 and a Windows Network, but this might not be ideal if you have files in your home folder tree that you want to share. By default, Samba shares the home folder when the Samba user matches a system user, but the files and folders are read only. This can be changed by editing the Samba configuration:
sudo nano /etc/samba/smb.conf
Scroll through the file to locate the share definitions section:
#======================= Share Definitions =======================

[homes]
   comment = Home Directories
   browseable = no

# By default, the home directories are exported read-only. Change the
# next parameter to 'no' if you want to be able to write to them.
   read only = yes
Change the read only setting to no then save the file.
Restart the Samba service for the change to take effect.

Conclusion
Installing and configuring Samba on your Raspberry Pi 5 is an excellent way to streamline file sharing and improve your astrophotography workflow. With the ability to easily transfer images, video, and data files from your Pi to a Windows machine, you can optimize your processing pipeline, perform real-time file sharing, and even automate backups of your precious astrophotography data.
Enjoy effortless file management and focus on capturing stunning celestial images!
Clear skies!