
Following on from our post Routing KStars Notifications to GNS, we thought it would be useful to use the same approach to route KStars notifications to other messaging providers, such as Pushover.
What is Pushover
Pushover is a real-time notification service designed to send alerts and messages across devices, making it easy to stay informed about important events or updates. It is commonly used by developers, system administrators, businesses, and individuals to deliver notifications to mobile devices and desktop computers. The mobile app costs a one-time fee of $5, after which users can send unlimited notifications without any additional charges. There’s a free 30 day trial available, which allows up to 7,500 messages per month.
How KStars Notifications Work
KStars uses notifications to report on events encountered during operation. Each event supports up to six actions initiated when the event is detected. Some events are preconfigured to play a basic sound, but can also show a pop-up message, write an entry to a logfile, mark a taskbar entry, run a command, or use a speech engine to read some text, or a combination.
Sending KStars Notifications to the Pushover API
We will create a Python web server that accepts requests from remote hosts, and route those requests to the Pushover API. This way, we can use the command action for the KStars event handler to make a web request to the web server, adding a message specific to the event directly in the URL.
Step 1: Obtain a Pushover API Key and Register Your Application
Head over to the Pushover website and register a user account. Once registered, you will be offered a User Key. Next, you register your application, which provides you with your Application API Token. The User Key and Token are used below.
Get the Pushover mobile application onto your phone, then sign in to your account.
Step 2: Install Python
Decide where you want to host the Python webserver, then install Python there. The Python download page provides the latest versions for different platforms, currently 3.12.5. Once downloaded, run through the installation process. To verify, open a command line and check the version:
python --version
Python 3.12.5
Step 3: Setting Up and Activating a Python Virtual Environment
A virtual environment allows you to create an isolated space for your Python projects, preventing package conflicts. Navigate to your project directory and create a virtual environment.
mkdir kstars_pushover
cd kstars_pushover
python -m venv pushover_env
Activate the virtual environment using the following command:
source pushover_env/bin/activate
Your terminal prompt will change to indicate that the virtual environment is active. You can now install packages within this environment without affecting the global Python installation.
Step 4: Install Flask Libraries
The lightweight Python web server is provided by Flask, so you need to install the Flask package using the Python installer:
pip install -U Flask
Step 5: Create the Web Server Script
Create the Flask web server script using your favourite script editor:
from flask import Flask
import http.client, urllib

app = Flask(__name__)

@app.route("/pushover/<string:text>")
def message(text):
    conn = http.client.HTTPSConnection("api.pushover.net:443")
    conn.request("POST", "/1/messages.json",
      urllib.parse.urlencode({
        "token": "ah4t1jhwsnakeoilfhg77f6wefmvv",
        "user": "udy87wsnakeoilefjhhwe87edfbh1hms",
        "message": text,
      }), { "Content-type": "application/x-www-form-urlencoded" })
    resp = conn.getresponse()
    return "<h1>" + text + "</h1><h2>" + str(resp.status) + "</h2><h3>" + resp.reason + "</h3>"
Replace the token and user values with your Application API Token and User Key obtained through the Pushover website.
Name the script kstars_pushover.py. You can choose any name you like, just don’t call it flask.py as that will cause problems!
Step 6: Start the Web Server
The Flask web server is started from the command line:
python -m flask --app kstars_pushover run --host=0.0.0.0
We want the web server to service requests from anywhere on the network, so we bind the service to the 0.0.0.0 address. The service uses port 5000 by default. If you are conscious about security and want to restrict the service address, or change the port number, then refer to the Flask documentation.
 * Serving Flask app 'kstars_pushover'
 * Debug mode: off
WARNING: This is a development server. Do not use it in a production deployment. Use a production WSGI server instead.
 * Running on all addresses (0.0.0.0)
 * Running on http://127.0.0.1:5000
 * Running on http://192.168.178.67:5000
Press CTRL+C to quit
Step 7: Test the Web Server Alerts
With the Flask web server running, it is time to test. Before starting, you should note that the message string should meet the encoding requirements for a URL, which means that characters like spaces, slashes, ampersands, and question marks should be replaced with their URL safe equivalents:
- %20 – Space
- %2F – Forward slash
- %26 – Ampersand
- %3F – Question mark
W3Schools provide a handy tool to encode any string into a URL safe string.
Open a web browser on the system where the Python webserver is running and enter the complete URL for event.
http://127.0.0.1:5000/pushover/Mount%20Parking
You should see the request handled by the web server, and a HTTP 200 status code returned:
127.0.0.1 - - [04/Sep/2024 16:00:04] "GET /pushover/Mount%20Parking HTTP/1.1" 200 -
The Pushover mobile app reports the status:
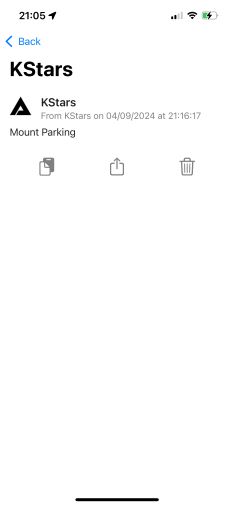
Step 8: Configure KStars Notifications
Once all the tests work out, the next step is to make the web requests using command calls from the KStars notifications themselves.
Open KStars then go to Settings->Configure Notifications...:
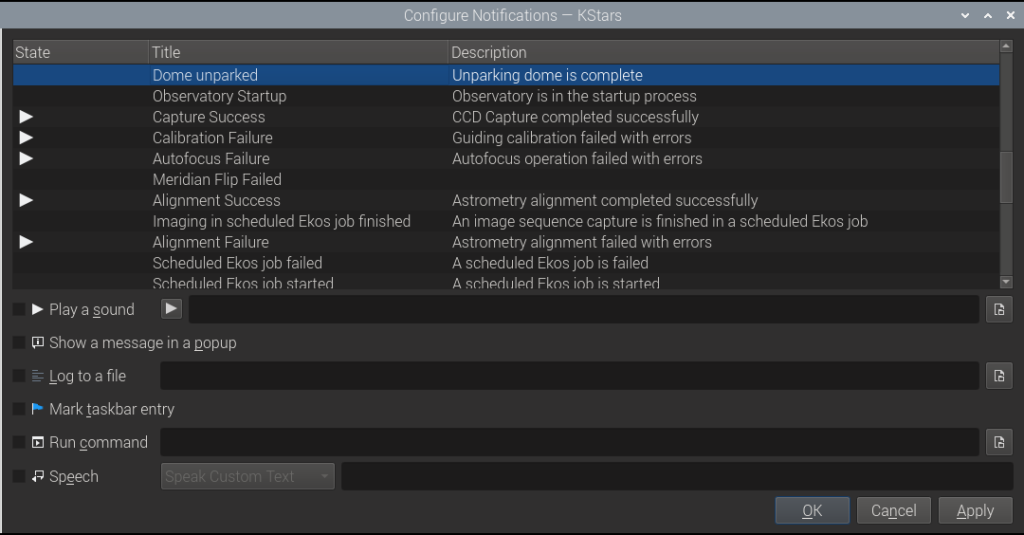
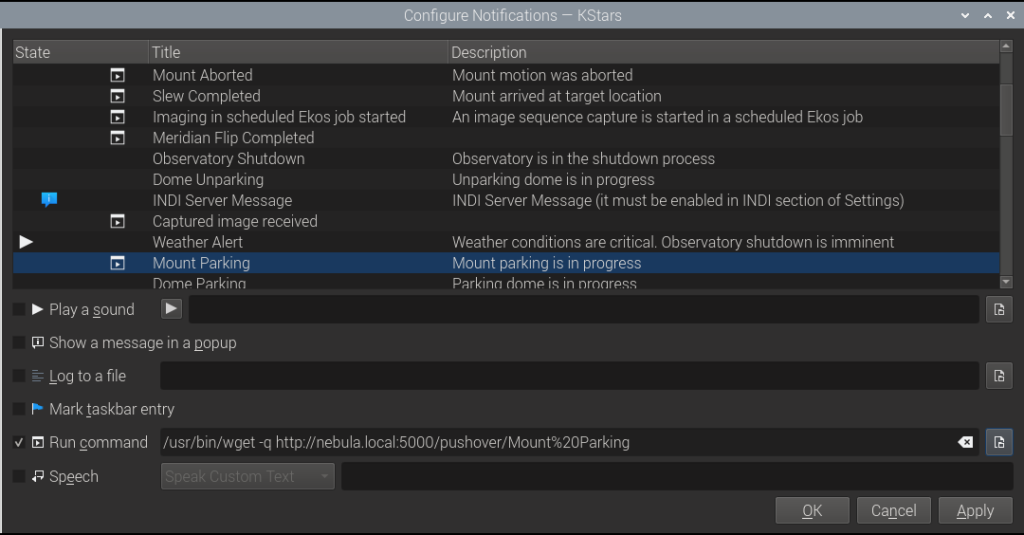
Select an event you expect to come across in your sequence, then check the Run command box. Enter the fully qualified command to make a web request, for which we use /usr/bin/wget. For example, select the Mount Parking event:
/usr/bin/wget -q http://nebula.local:5000/pushover/Mount%20Parking
If you are running KStars on a different system then you must change the URL to reach the system on which the web server is running.
Repeat the setup for other events.
Step 9: Receive Alerts From Your Automated Sequence
Once all anticipated events are configured, you should receive messages in the Pushover mobile app and in other target you configure in your Pushover account.
Clear skies!