With its compact size, low power consumption, and versatility, the Raspberry Pi 5 can serve as the brain of an astronomical imaging system. It can control devices such as telescopes, cameras, and mounts. The Instrument Neutral Distributed Interface (INDI) serves as one essential software component for this purpose. This framework controls astronomical instruments. In this guide, we’ll walk you through the steps to build INDI from source. Then, we will install it on a Raspberry Pi 5.
This article describes a procedure to install software on a Raspberry Pi 5 with 8G RAM running Raspberry Pi OS (64-bit) (Debian v.12 bookworm) booted directly from a 1TB NVMe SSD PCIe drive. This procedure may work for other configurations, so please do let us know if it does, or tell us about any issues you faced and your configuration. Thanks!
Prerequisites:
Before we dive into the installation process, make sure you have the following:
- A Raspberry Pi 5 board with NVMe SSD installed. Check out our guide Unleashing Raspberry Pi 5 Power: Installing NVMe SSD via PCIe for more information.
- A stable internet connection for downloading software packages.
- Basic familiarity with the Raspberry Pi 5 environment, including how to access it via SSH or directly through a monitor and keyboard.
Step 1: Prepare your Raspberry Pi 5
Begin by ensuring that your Raspberry Pi 5 is up to date. Open a terminal or SSH session and run the following commands:
sudo apt update && sudo apt upgrade
This will update the package lists and upgrade any installed packages to their latest versions.
Step 2: Build INDI from Source Code
The prepackaged versions of INDI are out of date, and will not be compatible with other astronomy software that is available for the Raspberry Pi 5, so we will build the package from source code. First, we need to install some prerequisites:
sudo apt install -y git cdbs dkms cmake fxload libev-dev libgps-dev libgsl-dev libraw-dev libusb-dev \
  zlib1g-dev libftdi-dev libjpeg-dev libkrb5-dev libnova-dev libtiff-dev libfftw3-dev librtlsdr-dev \
  libcfitsio-dev libgphoto2-dev build-essential libusb-1.0-0-dev libdc1394-dev libboost-regex-dev \
  libcurl4-gnutls-dev libtheora-dev
Create a project directory that you will download the source into:
mkdir ~/Projects
cd ~/Projects
Are you planning to use Pixinsight’s XISF file format for your image processing? Then you may want to include XISF support in your INDI build, which you build from source published on the author’s Gitea repository:
git clone https://gitea.nouspiro.space/nou/libXISF.git
cd ~/Projects/libXISF
cmake -B build -S .
cmake --build build --parallel
sudo cmake --install build
Make the libXISF library available to other libraries:
sudo ldconfig
Download the INDI source code from the official INDI repository on GitHub. We will use a shallow clone to speed things up and save space:
cd ~/Projects
git clone --depth 1 https://github.com/indilib/indi.git
Build the code:
mkdir -p ~/Projects/indi/tmp
cd ~/Projects/indi/tmp
cmake -DCMAKE_INSTALL_PREFIX=/usr -DCMAKE_BUILD_TYPE=Debug ~/Projects/indi
make -j4
sudo make install
INDI server is now installed. You can find the server version by entering the command without parameters:
indiserver
INDI Library: 2.1.1
Code v2.1.1-tgz. Protocol 1.7.
Step 3: Installing 3rd Party Device Drivers
The INDI core library ships with a good selection of INDI core device drivers by default. Many more drivers are available from 3rd party providers, so if you don’t find your required driver in the core package, then there is a good chance it will be available in the INDI 3rd party repository. We will build these from source as well, again using a shallow clone:
cd ~/Projects
git clone --depth=1 https://github.com/indilib/indi-3rdparty
Now we have the source code for all of the 3rd party device drivers, but we only want to compile the ones we need. For this guide, we will compile the EQMod Mount driver, in case we have an EQMod mount we want to use:
mkdir -p ~/Projects/indi-eqmod/tmp
cd ~/Projects/indi-eqmod/tmp
cmake -DCMAKE_INSTALL_PREFIX=/usr -DCMAKE_BUILD_TYPE=Debug ~/Projects/indi-3rdparty/indi-eqmod
make -j4
sudo make install
Repeat this procedure for every 3rd party device driver you need to install.
Step 4: Configure Network for Remote INDI Access
By default, INDI listens for connections on port 7624. If you’re using INDI on the Raspberry Pi 5 itself, you can skip this step. However, if you intend to control your Raspberry Pi 5 remotely from another device, you may need to open port 7624 on your router and forward it to your Raspberry Pi’s local IP address.
Step 5: Test INDI
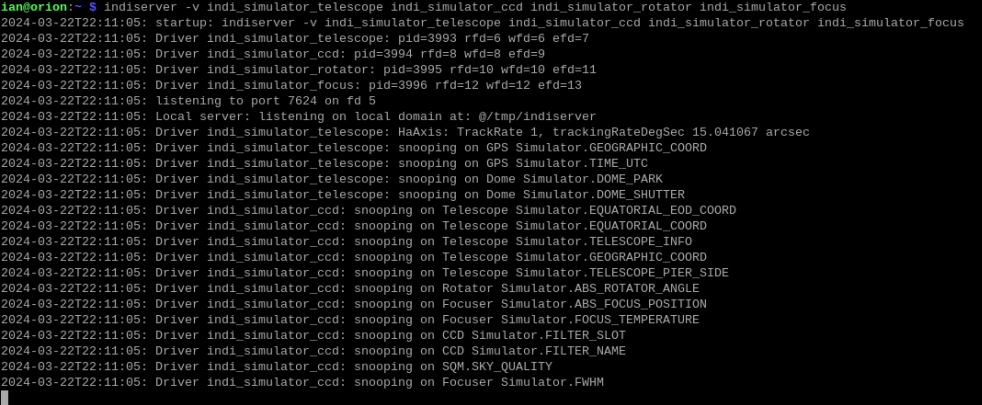
To ensure that INDI is installed and functioning correctly, you can run a simple test using simulated devices. Open a terminal and type the following command to start the INDI server in verbose logging mode:
indiserver -v indi_simulator_telescope indi_simulator_ccd indi_simulator_rotator indi_simulator_focus
You can find a list of available INDI drivers on the INDI website.
Step 6: Connect to INDI
Once the INDI server is running, you can connect to it using an INDI client application installed on your Raspberry Pi 5 or on another computer:
Raspberry Pi 5 Software Supporting INDI
Install your preferred INDI client on your local machine or remote computer and connect to the Raspberry Pi by specifying its IP address and port number (default is 7624).
Conclusion:
With INDI successfully installed on your Raspberry Pi 5, you now have the foundation for building a powerful astronomical imaging system. Whether you’re a seasoned astrophotographer or a beginner, the combination of Raspberry Pi and INDI opens up a world of possibilities. So gather your equipment, set up your Raspberry Pi, and embark on a journey to uncover the wonders of the universe from your backyard. Happy stargazing!
excellent set of guides, thank you.
I was having failure at installing the indi-asi driver for the zwo/asi cameras from git source, so I went to the OS/rpi-bookworm apt and installed from there:
sudo apt install indi-asi
and success with using ekos capturing images.
my system:
– rpi 5 8G
– zwo asi178mm
– az-gti eqmode
– gpsd using USB GPS Receiver https://a.co/d/9ksQGwS
– .96″ oled status display using rpi5’s gpio
– network auto selects eth0/wifi/hotspot
ekos asks if it should use attached GPS/gpsd for those times that I am away from internet in dark skies.
thanks for the feedback, nice to hear that you find the guides useful.
Hi,
I’m new to these Unix builds & I have built the Indi server with no apparent errors, until I test the Indi server. When I run the test I get this error:
Driver indi_simulator_rotator: indi_simulator_rotator: error while loading shared libraries: libXISF.so.0: cannot open shared object file: No such file or directory
2024-06-13T09:58:01: Driver indi_simulator_ccd: indi_simulator_ccd: error while loading shared libraries: libXISF.so.0: cannot open shared object file: No such file or directory
I have found the library libXISF.so.0 in the ./libXISF/build folder, but not sure if that is where a copy should be.
Can anyone please advise?
Hi Stewart, there is an instruction in Step 2 above to build the XISF library if you are planning to use any driver that relies on it. Did you follow the instruction to build the library?
Pingback: Installing KStars and Ekos on Raspberry Pi 5 - ASTROISK
Pingback: Installing PHD2 on a Raspberry Pi 5 - ASTROISK
Hi I got kstars working but no ekos in the menus…
Hello, did you first install INDI following the instructions on this site?
Why Debug version of INDI? There is some problems with Release optimization?
Hi Vladimir, GNU debugging (GDB) helps with troubleshooting issues during execution. INDI has two levels of debugging, at application level and GDB at system level. If space is a concern for you, you can remove the DCMAKE_BUILD_TYPE=Debug compiler option to disable GDB. I will add this to the instructions to make them clearer. Thanks, Ian