
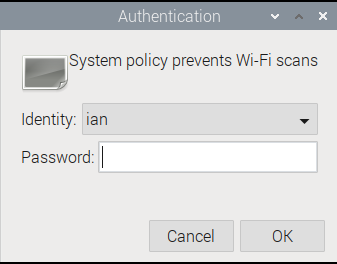
If you are working with a Raspberry Pi 5 over XRDP and need to perform Wi-Fi scans, you might encounter permission issues, typically accompanied by the constant appearance of an authentication prompt whenever the Wi-Fi icon is clicked:
This is due to a system service called Polkit (formerly PolicyKit) which is designed to define and handle policies for unprivileged processes to communicate with privileged ones. Configuring Polkit LocalAuthority correctly can allow non-privileged users to perform tasks such as Wi-Fi scans without needing elevated permissions.
In this blog post, we will walk through the steps to configure Polkit LocalAuthority to enable Wi-Fi scans on your Raspberry Pi 5.
Step 1: Install Necessary Packages
Before we start, ensure that you have all necessary packages installed. Typically, you’ll need iw and polkit. You can install these using the following command:
sudo apt update && sudo apt upgrade
sudo apt install iw policykit-1
Step 2: Create a Polkit Policy File
Polkit uses policy files to define rules. We will create a policy file to allow Wi-Fi scans:
sudo nano /etc/polkit-1/localauthority/50-local.d/10-enable-wifi-scans.pkla
Step 3: Define the Policy
In the newly created file, add the following content to define a policy that allows Wi-Fi scans:
[Allow Wi-Fi Scans]
Identity=unix-user:your-username
Action=org.freedesktop.NetworkManager.wifi.scan;org.freedesktop.NetworkManager.enable-disable-wifi;org.freedesktop.NetworkManager.settings.modify.own;org.freedesktop.NetworkManager.settings.modify.system;org.freedesktop.NetworkManager.network-control
ResultAny=yes
ResultInactive=yes
ResultActive=yes
Replace your-username with the username you are configuring this for. If you want to allow this for all users, you can use unix-user:*.
Here’s a breakdown of what each line means:
[Allow Wi-Fi Scans]: This is a descriptive label for the policy.Identity=unix-user:your-username: This specifies the user or group the policy applies to.Action=org.freedesktop.NetworkManager.wifi.scan;org.freedesktop.NetworkManager.enable-disable-wifi;org.freedesktop.NetworkManager.settings.modify.own;org.freedesktop.NetworkManager.settings.modify.system;org.freedesktop.NetworkManager.network-control: This defines the actions that ares being allowed. In this case, it is controlling network actions like Wi-Fi scans.ResultAny=yes,ResultInactive=yes,ResultActive=yes: These lines specify the result of the policy in different states. Setting them toyesgrants permission.
Step 4: Save and Close the File
After adding the necessary content, save and close the file. In nano, you can do this by pressing CTRL+O to save, and CTRL+X to exit.
Step 5: Restart the Polkit Service
sudo systemctl restart polkit
Step 6: Verify the Configuration
If everything is set up correctly, you should be able to see the available Wi-Fi networks without needing to use sudo.
Conclusion
By configuring Polkit LocalAuthority on your Raspberry Pi 5, you can allow non-privileged users to perform Wi-Fi scans safely and efficiently. This method enhances security by limiting the need for elevated permissions while maintaining functionality.
Feel free to explore more Polkit policies to fine-tune permissions for other tasks as needed. With these configurations, your Raspberry Pi can become a more flexible and secure tool for your projects.
Happy scanning!